This raised timber base kit installation guide illustrates how it is made up.
Recycled plastic posts (which will not rot and also form a damp proof course). These are concreted into the ground with postmix “readymixed” concrete. These are supplied in small easy to handle 20kg bags. The posts are at approximately 2m spacings around the perimeter. Extra posts are supplied for half way along each internal joist (if more than 3m span). These posts are supplied in long lengths and will require cutting on site. We allow for each post to be 400mm long. These plastic posts can be cut and drilled with normal hand tools.
A big advantage is that you do not have to level the ground as you would with a concrete base. You simply use longer posts where the ground level drops away. NB – extra post may be required in this instant – please let us know at the time of order.
We are able to provide a CAD drawing for each base if you intend to install this item yourself.
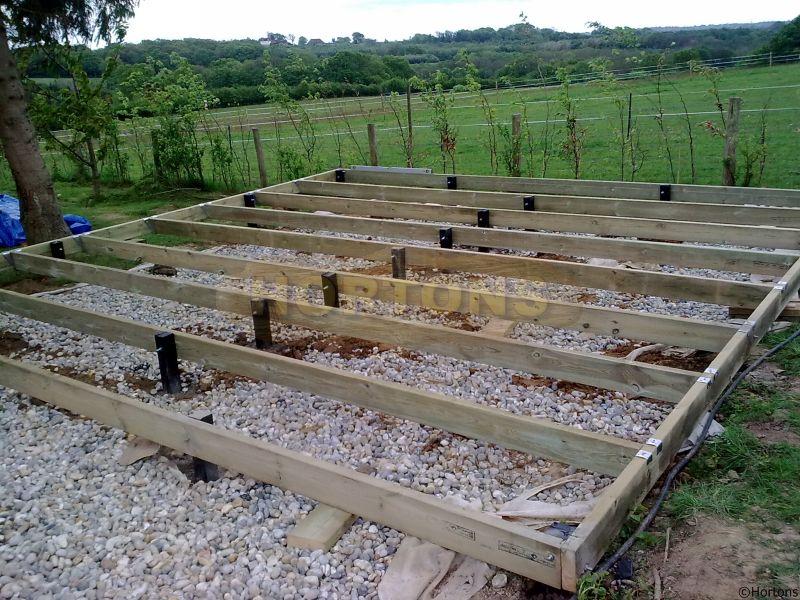
Method of construction of the Hortons raised timber base
- 1) 47x150mm tanalised timbers are fixed together to form the ring beam around the outer edge. The timbers may need to be cut down to suit your cabin as they are supplied in standard lengths,. Please check this before assembly. Chock the complete ring beam up to be level just above ground level. This gives under floor ventilation. The outer ring beam is then formed for the main cabin walls to bear on.
- 2) This then dictates where the corner posts are to be concreted into the ground. Once the corner holes are dug, the plastic posts can then be offered into the holes. Cut off to the correct length (the posts are supplied in long lengths to give flexibility for the lengths required. We allow a nominal 400mm length per post). Bolt to each of the timbers that it is in contact with. Lengths of threaded rod, nuts and washers are supplied with our kits. Finally concrete in using the quick setting postmix which is also supplied with our kits.
- 3) Fix further intermediate plastic posts onto the outer ring beam in the same manner as the corner posts. NB – no more than 2m spacings.
- 4) The position of the internal joists can then be marked around the outer ring beam timbers. Joist hangers (supplied with the kit) are then fixed according to the marking out. Folowed by the internal joists fixed into the joist hangers. Joist hangers are only required where there are no posts to bolt the timbers to. Joist hangers make it difficult to drill the bolt holes as you would need to drill through metal as well.
- 5) If the span of the internal joists is greater than 3m then intermediate plastic posts are required. These are are bolted to the joists in the same manner as the outer ring beam.
Further information to help you install the base kit
Your posts should not rest on the bottom of the holes. They should be suspended about 100mm up from the bottom (by bolting them to the chocked up timbers). This will then make sure that the concrete is underneath the posts. This gives enough support (we allow half a bag of postmix for each post). There is no need to fill the holes all the way up to the top. All of the weight is downwards rather than sideways as would be expected with a fencepost. Fences have a lot of imposed sideways wind pressure, which is not the case here.
There is the possibility that more materials may be required once the groundworks have started. There may be soft ground or tree roots where posts have to be moved in order to span across them. Or if heavy equipment is to be installed where an extra post or more concrete may be required. This would be at extra cost. This is impossible to allow for before this point but can be supplied very quickly to avoid delays.
It is the customers responsibility to ensure that reasonable precautions have been taken if potential problems are known beforehand….
- Heavy loads are to be put onto the base (especially if they are concentrated in one area)
- Built up ground
- Hard ground in the summer which becomes soft ground in the winter due to rising water tables, etc
In order to alleviate any future problems (ie subsidence). It is not possible to guarantee the stability of the base unless you carry a ground survey. Employing a qualified structural engineer to determine the structural calculations is a very wise thing to do.
General information
This forms a very sturdy base onto which the cabins can be built directly. It also gives large time advantages over the more traditional concrete bases.
It is also possible to use these bases to level up an existing base. This is simply done by resting the plastic posts on top of what is already there. However we are unable to guarantee the long term stability of the base. This is because we won’t be sure of the integrity of what the posts are resting on top of. Paving slabs or tarmac may not be laid on a proper sub-base for example. Hortons will not be liable for any subsequent movement which may affect the building on top of the base. Gaps in logs, windows/doors not working properly etc are all possible if the base moves.
If the building is greater than 30 sq m internal floor area, then building regulations will apply. We are able to upgrade the raised timber base to comply with building regulations using concrete plinths at extra cost. This cost can not be determined until calculations have been made by your structural engineer. Possibly also requiring inspections made by a local council building control officer once the work has commenced. They will determine the number of plinths and timber sizes required which is subject to site/soil conditions. And factor in the size/weight of the building going on top. NB – in these circumstances we do not quote for or supply extra plinth blocks in order to level a site. This can vary and will depend on site conditions/slopes and will be charged at extra cost if required).
There are more useful hints in our FAQ page